by Florence B.
We’re halfway through November and getting closer to Turkey Day! No wait, I mean Wear-Loose-Clothes-For-Eating Day! Ack, one more try -- I mean Thanksgiving Day! Thanksgiving is all about feeling thankful, but we can’t forget about the food! So, for this mid-month blog post, let’s talk about playing with our food!
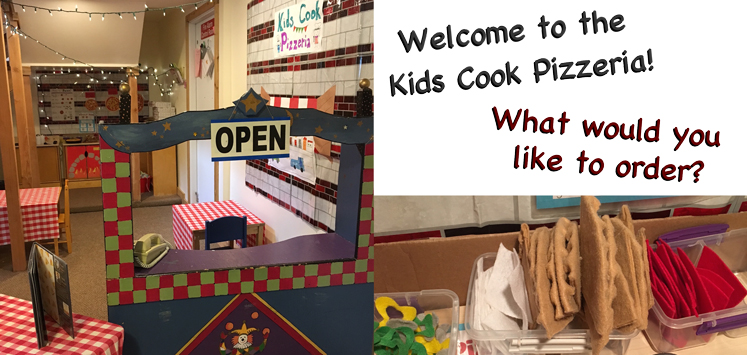
But first, I have to take a quick detour to say how AWESOME the pizza restaurant in the dramatic play area is! Whether you’re a visitor to the blog and have no idea what I’m talking about or a member of the school who has already experienced the awesomeness--I still want to tell you how much I love what the curriculum folks did! If you’re stationed in the upper level, make sure to stop by the dramatic play area, and check out all the little details you can find! I’ve seen home-made felt pieces before, but the school’s set goes beyond and looks like a true labor of love by whomever created the set! Actually, let’s just say that the WHOLE set up and design looks like a labor of love! Thanks, Curriculum Team!
OK, back to on point, eh?! Yes, yes, we always hear we shouldn’t play with our food, but when you’re an infant/toddler/preschooler (and maaaaaaybe adult, yup), playing with your food is also a potential learning opportunity that’s also mega fun! How? Well, let’s start off with the basics and two simple words: sensory experiences. OK, well maybe not ‘simple’ words since that sounds fancy when all it really boils down to is letting your kiddos discover something new in a preferably (to them) messy way (make sure you know where your vacuum is at all times)! By the way, I’m totally cheating by saying ‘Playing with Your Food’ since I’m really talking about food ingredients, but ‘Playing with Basic Dry Goods and Edible Components You Can Find in Your Kitchen’ just doesn’t have the same ring to it. Anyway, let’s start small and go with simple items for sensory fun before moving up to the big leagues with recipes!
1. Basic Sensory Table Fun!
Ah, let’s start down in Basic-Land. With a simple sensory table, you can let your little ones explore the different textures of basic food ingredients. The nice thing about playing with food stuff is that you don’t have to panic if your little one succeeds in slipping in a taste when you least expect it. Another plus is that you can buy ingredients in bulk, organic, non-GMO, cheap store brand, or any other available combination you want or just raid your own pantry when your kiddos come wandering around while you’re trying to cook a meal. You don’t need a fancy sensory table; you can use large bowls, repurpose a baby tub, dump out a storage bin, or get creative with whatever you can find lying around the house. Some fun ingredients you can experiment are oatmeal, cornmeal, lentils, flaxseed, rice, and popcorn kernels! They’re fairly easy to clean since they’re large enough a broom can sweep away, and a vacuum will happily pick up loose strays for the smaller items.
While exploring different textures works great while our little ones are still...well...little, once they’re bigger/older and out of choking hazard range, you can add treasures for them to discover. Let them explore with measuring spoons and cups making their own recipes while you follow your own and get dinner done! Check out some of the photos below of the sensory table at the school in action!
2. Chili Beans
This one has to be in a section of its own since I love how uncooked chili beans are a perfect play item in disguise, and you literally don’t have to do anything except open the bag. Inside, you’ll find beans of different colors and sizes; get those little ones to practice their sorting skills! These beans are a great size to practice fine-motor skills, too, as well as being the perfect size for putting in order and counting to practice some math skills! Also, these guys can be used to make shakers for dancing (what little ones doesn’t like to do that?!)!
3. Cloud Dough
Alright, here we go: time for our first official recipe! To make this soft concoction, mix 1 cup of vegetable oil and 8 cups of flour. That’s. It. The hardest part is finding 8 cups of flour, but isn’t that what Costco is for? This stuff is fun, because it can hold shapes if you use a mold and easily crumble with just a tap. Best comparison I can think of is Kinetic Sand, except this one is all natural, way softer, and makes your dry winter hands feel like they just went to a spa! Check out the photo below for some Cloud Dough in action with the disclaimer that this can get messy! Make sure you have some floor protection if you have kiddos who love mess, or do it outside since the oil can make non-carpeted floors slick (and you don’t even want to try to get this out of carpet).
4. Oobleck
Now for one of my favorite recipes: Oobleck (isn’t that a fun name?! Thanks, Dr. Seuss--for the name and not the recipe that is!). This one’s also a real challenge of a recipe. Here we go: mix 2 parts cornstarch to 1 part water. Yep. That’s all you need to do in quite possibly one of the COOLEST recipes ever! Once you get past how cool Oobleck is to touch and play with, you can get to the science-y part. You can tell your friends you made a Non-Newtonian liquid, which means whatever you do, don’t pour this down the sink, because it’s not a normal liquid (friends don’t let friends dump Oobleck down the drain!). If you do, you will be telling a plumber how your fancy Non-Newtonian liquid made your clogged sink very Non-Worky. Don’t panic about washing your hands or letting a little bit wash down--just don’t put a lot at one time!
Ha, now with that warning out of the way: this stuff is so cool so MAKE THIS, and let your littles have fun with it! Since it’s just cornstarch and water, for clean up, you can wait for it to dry a bit and scrape it off into the trash or vacuum up when completely dry. You can even make it in a ziploc and have your little one play with it there if you just want to try a small bit to check it out. It really is a crazy liquid since if you apply force (like squeezing into a ball or even poking it) it will harden until you stop and then move like regular liquid again. Seriously, try it! I wish pictures could show how cool it is to play with, but you really need to experience it! Below you can see how you can make an Oobleck ball if you keep pressing it and applying force, but once you stop, it melts back down! You can also play with it by adding more water or cornstarch and seeing what different behaviors you get (warning: nerd blogger alert)!
5. Homemade Playdoh
Last, but certainly not least...homemade playdough! For this recipe, I’m going to send you off to another place to get it, but don’t worry, it’s not far; you’ll still be on the school site. Also, here’s a pic of playdough at school! I love glitter in the playdough (ESPECIALLY when it’s not in my home, woohoo!)!
I bet it’s safe to say I don’t have to explain the playdoh fun factor; it’s fun for any age! Knowing exactly what goes into what your kiddo plays with is a huge relief so enjoy the recipe! As an added plus, it’s a VERY forgiving recipe so let your kiddo help you with the measuring and pouring into the pot. Worse case, if your playdough comes out too sticky, you can have your little ones sprinkle flour and knead until you get the perfect playdough! If too dry, use a dropper and add water drop by drop until it’s juuuuust right! Or if the ACTUAL worst case happens and your playdough is unsavable, then you get the excuse to make the recipe again with your kiddo. Sure, getting playdough is the end goal, but the journey is just as important!
Finally, go ahead and store your playdough in the kitchen with the rest of the playdough toys--and by that, I mean your cooking tools! Cookie cutters are great for cutting out playdough shapes, and that rolling pin you barely use makes a perfect rolling tool for playdough, too! That garlic press is actually a playdough spaghetti maker, and that cheese spreader is a playdough knife! Give your kids some cooking tools, and you’ll be surprised with what they come up with.
So there you have it! I hope you have fun playing with your food aka PwBDGaECYCFiYK (see, it just doesn’t floooow right). If you have other ideas or recipes for sensory play, give a shout out in the comments or email me at blog@bothellfamilycoop.org


